I haven't done much folding yet, as I've been busy with other stuff (did I mention that as well as doing this, I work full time and am also studying for TWO diplomas?)
I have made ten cranes though, which is 1%. it's enough to actually register as a percentage!
A few people have asked about me starting to fold before I've definitely had the go-ahead. I had planned on waiting, but it's a lot of work in addition to everything else I have going on. Not only is there the folding of the cranes, but getting the paper sorted takes ages, plus putting the LEDs in, then connecting the batteries. It will all take time, and I'd rather err on the side of caution.
Plus if I don't get in, I can always have a giveaway of the cranes I've folded so far!
Showing posts with label paper. Show all posts
Showing posts with label paper. Show all posts
Wednesday, 31 March 2010


Sunday, 28 March 2010
How to fold an origami crane
If you want to join in with folding 1000 cranes, here's how you do it (apologies for the somewhat blurry photos):

1. starting with a square piece of paper, fold in half diagonally

2. fold in half diagonally again, so it's in quarters

3. lifting the triangular flap you just made, open it out and press it down

4. it should look like this

5. turn over and repeat on the other side

6. fold the edges into the middle. turn over and repeat

7. you should have a kite shape

8. fold the top triangle down along the top of the previous folds (so it makes an inverted triangle)

9. unfold the folds from steps 7 and 8. lift the front flap along the fold from step 8 (it looks like a bird's beak)

10. flatten out. turn over and repeat. (incidentally, this is the bird base)

11. fold the lower outside edges into the middle. turn over and repeat

12. it should look like this

13. turn the right hand flap over as if turning the page of a book (i know that sound rubbish, but it's hard to describe! you should see what i mean)

14. it will look like this

15. fold the bottom point up to meet the top point

16. turn over and repeat steps 13 to 15. it will end up looking like this

17. turn the sides over, again like turning the pages of a book. it will look like this

18. gently pull the inside points out from the centre. you just kind of squash the bottom bits down to keep them in place

19. it will look like this

20. fold the front flaps down - you'll see a natural place to fold them along the middle bit. turn over and repeat

21. take the top of one of the points and gently fold it down. as you fold it down, you'll see a crease in the middle - if you press on that, it will sort of collapse in on itself and create the crane's head

22. it will look like this - you can see how it looks like a crane now!

23. take the wings and gently pull them apart. you'll see a square bit forming in the middle

24. press the square bit down gently and it will pop into place. this is the body of the crane

25. ta da! crane is done!

1. starting with a square piece of paper, fold in half diagonally

2. fold in half diagonally again, so it's in quarters

3. lifting the triangular flap you just made, open it out and press it down

4. it should look like this

5. turn over and repeat on the other side

6. fold the edges into the middle. turn over and repeat

7. you should have a kite shape

8. fold the top triangle down along the top of the previous folds (so it makes an inverted triangle)

9. unfold the folds from steps 7 and 8. lift the front flap along the fold from step 8 (it looks like a bird's beak)

10. flatten out. turn over and repeat. (incidentally, this is the bird base)

11. fold the lower outside edges into the middle. turn over and repeat

12. it should look like this
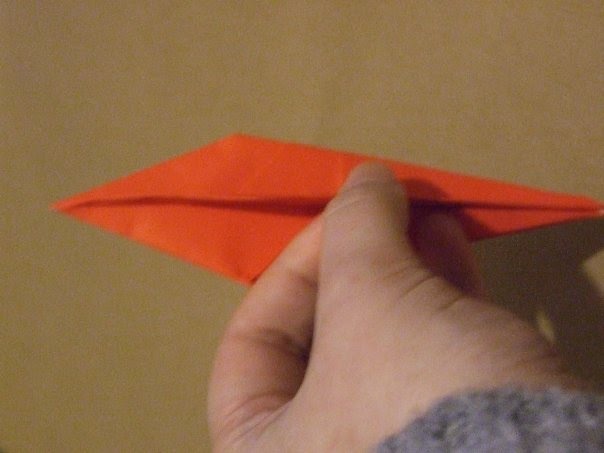
13. turn the right hand flap over as if turning the page of a book (i know that sound rubbish, but it's hard to describe! you should see what i mean)

14. it will look like this

15. fold the bottom point up to meet the top point

16. turn over and repeat steps 13 to 15. it will end up looking like this

17. turn the sides over, again like turning the pages of a book. it will look like this

18. gently pull the inside points out from the centre. you just kind of squash the bottom bits down to keep them in place

19. it will look like this

20. fold the front flaps down - you'll see a natural place to fold them along the middle bit. turn over and repeat

21. take the top of one of the points and gently fold it down. as you fold it down, you'll see a crease in the middle - if you press on that, it will sort of collapse in on itself and create the crane's head

22. it will look like this - you can see how it looks like a crane now!

23. take the wings and gently pull them apart. you'll see a square bit forming in the middle

24. press the square bit down gently and it will pop into place. this is the body of the crane

25. ta da! crane is done!
Saturday, 27 March 2010
It's just a fold to the left...
As it is pretty much a waiting game now until the deadline, it feels a bit odd. the prototype is done, and until I'm making masses of them, I can't foresee the problems that are going to come up. I don't want to buy all the expensive electronic bits until I know I'm definitely going ahead, so I felt at a bit of a loss.
So I did what I always do when I'm at a loose end. I started folding.
I bought a ream of paper, and started making the cranes.
Getting the paper "ready" is a three part process: first I have to fold it to make a square, then cut the excess (which will be what I make the sailboats from), then stick a bit of sellotape into the centre to reinforce where the LED is going to stick through. Only then is the paper ready to fold into the crane. That's the bit that's a pain, rather than the actual origami stuff.
I'm trying to find a sort of totalizer for the blog, so that you can see how I'm getting on, but at the moment, I've folded two cranes. Okay, not so many, but I've made paper for loads more.
I'm also working on making a "how to" post, so if you want to join in, you can learn how to fold your own crane!
So I did what I always do when I'm at a loose end. I started folding.
I bought a ream of paper, and started making the cranes.
Getting the paper "ready" is a three part process: first I have to fold it to make a square, then cut the excess (which will be what I make the sailboats from), then stick a bit of sellotape into the centre to reinforce where the LED is going to stick through. Only then is the paper ready to fold into the crane. That's the bit that's a pain, rather than the actual origami stuff.
I'm trying to find a sort of totalizer for the blog, so that you can see how I'm getting on, but at the moment, I've folded two cranes. Okay, not so many, but I've made paper for loads more.
I'm also working on making a "how to" post, so if you want to join in, you can learn how to fold your own crane!
Wednesday, 24 February 2010
Crane vs. Crane
How could I get my cranes to glow? The answer was obvious. Ask John.
John works in my office, and is a PhD in physics-ey stuff. Not particularly in electronics, but he’s a pretty good person to go to if you want to ask about how anything works. Plus, he watches the Discovery Channel a lot, and that’s good enough for me.
We came up with a couple of ideas, which were much better than my rather over-excited “tie them all to fairy lights!” suggestion. Next up were discussions on the actual cranes – we had to know what we’d be lighting before we could decide on how to do it.
Last time I made 1000 cranes I’d used everything from scrapbooking card to takeaway menus. There were even pages from books and stickers in there. This time round, I wanted plain white (the installation is supposed to represent peace and hope, so all pure white reinforced that), and something that was easy to fold (folding card over and over is hard on the hands, and this time, I had a deadline). It also had to be fairly cheap and easy to obtain, and as the cranes would be strung up, weight had to be a factor.
I narrowed it down to two main options for the paper to make the cranes out of:
- Printer paper. The pros of this are that it’s cheap, plentiful, and easy to fold with. Cons are that it doesn’t come in squares, so I’d have to make larger cranes (I’d originally been planning cranes made from 6”x6” paper, which is the standard size of the origami paper I usually use) to square it off easily, or I’d be stuck fiddling with it for a while making sure I was cutting out a perfect square. It’s also fairly thick, so I wasn’t sure if the light would shine through it enough.
- Origami paper. Standard origami paper is pretty easy to come by around here. It’s lightweight, thin (so light shines through easily), and obviously by its very nature easy to fold. It also comes in a standard square, so I could fold straight out of the packet. However, it’s much more expensive than printer paper (around £1 for a 100 sheet pack) and it comes in lots of colours, so even if I fold it “inside out” (so the white on the back of the paper is on the outside, and the colour on the inside) the colour will still glow through if it is lit from inside, and there will be some colours in a pack I can’t use (brown and black, and possibly other darker colours, as they’d swallow up the light inside), which again would make it more expensive.
After lots of test runs of making cranes of different sizes and different colours, and shoving a handy Christmas light into it to assess light distribution, I decided that the printer paper was a better choice all round, as the larger cranes didn’t detract from the effect so I could square it off easily, and I preferred the all-white as it was a clearer connotation (can you have a clear connotation?) of the peace message I was trying to put across. The Christmas light didn’t shine through brilliantly, but it was a small yellow old-style bulb rather than the LEDs we’d been looking at, so I wasn’t too worried about it.
I’d just made my first prototype light-up crane!
John works in my office, and is a PhD in physics-ey stuff. Not particularly in electronics, but he’s a pretty good person to go to if you want to ask about how anything works. Plus, he watches the Discovery Channel a lot, and that’s good enough for me.
We came up with a couple of ideas, which were much better than my rather over-excited “tie them all to fairy lights!” suggestion. Next up were discussions on the actual cranes – we had to know what we’d be lighting before we could decide on how to do it.
Last time I made 1000 cranes I’d used everything from scrapbooking card to takeaway menus. There were even pages from books and stickers in there. This time round, I wanted plain white (the installation is supposed to represent peace and hope, so all pure white reinforced that), and something that was easy to fold (folding card over and over is hard on the hands, and this time, I had a deadline). It also had to be fairly cheap and easy to obtain, and as the cranes would be strung up, weight had to be a factor.
I narrowed it down to two main options for the paper to make the cranes out of:
- Printer paper. The pros of this are that it’s cheap, plentiful, and easy to fold with. Cons are that it doesn’t come in squares, so I’d have to make larger cranes (I’d originally been planning cranes made from 6”x6” paper, which is the standard size of the origami paper I usually use) to square it off easily, or I’d be stuck fiddling with it for a while making sure I was cutting out a perfect square. It’s also fairly thick, so I wasn’t sure if the light would shine through it enough.
- Origami paper. Standard origami paper is pretty easy to come by around here. It’s lightweight, thin (so light shines through easily), and obviously by its very nature easy to fold. It also comes in a standard square, so I could fold straight out of the packet. However, it’s much more expensive than printer paper (around £1 for a 100 sheet pack) and it comes in lots of colours, so even if I fold it “inside out” (so the white on the back of the paper is on the outside, and the colour on the inside) the colour will still glow through if it is lit from inside, and there will be some colours in a pack I can’t use (brown and black, and possibly other darker colours, as they’d swallow up the light inside), which again would make it more expensive.
After lots of test runs of making cranes of different sizes and different colours, and shoving a handy Christmas light into it to assess light distribution, I decided that the printer paper was a better choice all round, as the larger cranes didn’t detract from the effect so I could square it off easily, and I preferred the all-white as it was a clearer connotation (can you have a clear connotation?) of the peace message I was trying to put across. The Christmas light didn’t shine through brilliantly, but it was a small yellow old-style bulb rather than the LEDs we’d been looking at, so I wasn’t too worried about it.
I’d just made my first prototype light-up crane!
Subscribe to:
Posts (Atom)