First thing on Friday morning, I went into the Town Hall tunnels. My mum had come along to help, and as we opened the door my heart leapt into my mouth. Would the nets have frayed and fallen? Had the few that had dropped been an omen and they'd all be lying on the floor? I took a step inside, and saw that around 100 had fallen off their strings, but nowhere near as bad as I'd imagined it to be. Quickly we scooped up the fallen ones, and sorted a plan.
As the majority of the nets were already up, it was a case of filling in the blank spaces. I'd worked out the night before that if I did strips of netting with cranes hanging off it, we could then hang these like tinsel along the side of the tunnels and in the gaps between nets. We got to work, and my mum figured out a quick way of tying the fallen cranes (which had no thread) to the ones with thread, thus quickening the process and meaning we were saving on thread. Unfortunately as we went to put one 'tinsel' up the ladder it was tied to fell over, and we ended up with a clump, but that was the only problem.
Until the pigeon. When I'd gone to get a couple of chairs from the cells, I'd noticed a pigeon lurking (I actually thought it was the ghost for a moment). We'd left it alone, and it had stayed out of our way, but then unfortunately two town hall people came down and one freaked out, which understandably freaked out the pigeon, which then started flying up and down the corridor. I chased it out of the way of the netting, as much concerned that it would get caught and hurt itself as to the damage it could do, and grabbed a warden. Who then decided the best course of action was to shoo it BACK down the corridor full of netting and string. The poor pigeon was frantic, I had visions of everything coming tumbling down, and the town hall people weren't really helping. In the end we managed to get it back into the cells, covered the end of the tunnel with material to stop it getting back in, and it finally left through the now-open door.
This seemed a good time to break for lunch, when I saw the only part of Light Night I would see this year, the giant heron in the Tiled Hall. Which was cool. Then it was back to work, and shortly after my friend Rachel, who has done a great blog post about Light Night, and her husband Andy arrived. We showed them what to do, then left them to it while we went and tackled the courtroom (you'd forgotten about that hadn't you?)
The courtroom was fairly straightforward. Material for a river, worksheets to make boats on the table, and cherry blossoms EVERYWHERE. The foldageddoners had come through strong, and I had a massive bin bag full. Big shout out to Rob, Lisa, Dave, Sue, Elly, Liz, Fran and everyone else who I might've missed out who made blossoms for me.
Back down in the tunnels, and we had about fifty cranes left. I'd kept saying we could just perch them on the heating pipes as if they'd roosted, but we were so close to having all one thousand 'flying' that we pressed on. At five minutes to five a steward came down to ask if we were ready to open in five minutes, just as I tied the last cable tie to hang the final string. We were there. One thousand cranes were flying through the Town Hall tunnels.
Piece of cake, huh?
Showing posts with label crane. Show all posts
Showing posts with label crane. Show all posts
Tuesday, 19 October 2010


Saturday, 9 October 2010
The final countdown
Sorry I haven't updated the blog this week - it has been more than manic.
On Monday morning I woke up at half past four in the morning, and had a panic attack that I wasn't going to get all the batteries in the cranes.
Wednesday I woke up and couldn't move my right hand, and it was all swollen. I still had 300 cranes to put batteries in.
Thursday I went down to the tunnels and half the people who had offered to help had pulled out. Then I wasn't allowed up the ladders on my own because of health and safety. Then the way that I had planned to attach the cranes didn't work. At lunchtime there still wasn't a single crane in the air.
It wasn't looking good...
On Monday morning I woke up at half past four in the morning, and had a panic attack that I wasn't going to get all the batteries in the cranes.
Wednesday I woke up and couldn't move my right hand, and it was all swollen. I still had 300 cranes to put batteries in.
Thursday I went down to the tunnels and half the people who had offered to help had pulled out. Then I wasn't allowed up the ladders on my own because of health and safety. Then the way that I had planned to attach the cranes didn't work. At lunchtime there still wasn't a single crane in the air.
It wasn't looking good...
Wednesday, 22 September 2010
Light up, light up
The LEDs arrived.
I started putting them in the cranes, through the bottom, and realised that at the rate it was taking me I wouldn't make Light Night 2012, let alone the Light Night in a few weeks. I was having to virtually completely unfold the crane, put the light in, then refold it.
This was the first real problem I've had since the start of the project, and at this late stage it panicked me that something so massive could go wrong. I'm also a little bit fixated with planning, so to have not factored in that my plan wouldn't work made me really angry with myself, and made me panic more.
Hours later, with a prototype crane so mangled it looked like the victim of a road traffic accident, and me sat sobbing on the sofa because I still couldn't figure out a quick way to put the LED in, and the way I was doing it was so complicated I couldn't possibly ask anyone else to help, and my lovely, gorgeous husband looked at it and said
"why don't you just cut a hole in the top, and drop the LED in?"
The man's a genius. It now takes around 30 seconds to do a crane, and once they're hung up, you won't even notice the hole in the top (it's covered over with sticky tape so the LED doesn't just pop out again).
I'm back on track!
I started putting them in the cranes, through the bottom, and realised that at the rate it was taking me I wouldn't make Light Night 2012, let alone the Light Night in a few weeks. I was having to virtually completely unfold the crane, put the light in, then refold it.
This was the first real problem I've had since the start of the project, and at this late stage it panicked me that something so massive could go wrong. I'm also a little bit fixated with planning, so to have not factored in that my plan wouldn't work made me really angry with myself, and made me panic more.
Hours later, with a prototype crane so mangled it looked like the victim of a road traffic accident, and me sat sobbing on the sofa because I still couldn't figure out a quick way to put the LED in, and the way I was doing it was so complicated I couldn't possibly ask anyone else to help, and my lovely, gorgeous husband looked at it and said
"why don't you just cut a hole in the top, and drop the LED in?"
The man's a genius. It now takes around 30 seconds to do a crane, and once they're hung up, you won't even notice the hole in the top (it's covered over with sticky tape so the LED doesn't just pop out again).
I'm back on track!
Tuesday, 7 September 2010
Final furlong
Have a quick look at the Totalizer in the right hand sidebar. At the time of writing this, it is at 940. By Friday the total will be 1000. One. Thousand. Cranes.
I've got it all planned out, twenty a day until Friday, when I'll do ten through the day, then I'm going to go to Nation of Shopkeepers pub to fold the last ten in the company of friends, then I'll have a big drink to celebrate.
If you're in Leeds, and you'd like to see the final ten being made, or you just want to come for a drink, then please feel free to drop in. I'll be there from half past four.
It feels weird being on the home straight. There's still LOADS to do for Light Night, but this part of it is almost over. It doesn't seem very long ago that I fudged the totalizer because 8 cranes didn't even show up on it, and now it's almost full. I have bags everywhere with cranes in, and I've got used to always carrying some paper just in case I have five minutes. My fingers won't know what to do!
I've got it all planned out, twenty a day until Friday, when I'll do ten through the day, then I'm going to go to Nation of Shopkeepers pub to fold the last ten in the company of friends, then I'll have a big drink to celebrate.
If you're in Leeds, and you'd like to see the final ten being made, or you just want to come for a drink, then please feel free to drop in. I'll be there from half past four.
It feels weird being on the home straight. There's still LOADS to do for Light Night, but this part of it is almost over. It doesn't seem very long ago that I fudged the totalizer because 8 cranes didn't even show up on it, and now it's almost full. I have bags everywhere with cranes in, and I've got used to always carrying some paper just in case I have five minutes. My fingers won't know what to do!
Tuesday, 27 July 2010
FIVE HUNDRED!!
That's right. As of Saturday night, I've folded 500 cranes. That's halfway there. Okay, we won't focus on the amount I've got left to do. I'll post a picture of them all at some point, sat in their little bags, waiting to be illuminated.
FIVE HUNDRED CRANES!!
It seems like forever since I started, although this blog tells me it wasn't all that long ago. A thousand seemed like such a massive number, but now 500 seems like an even bigger number as the deadline looms. I know I'll do it though. After all, I'm already halfway there.
Friday, 23 July 2010
Folding for Peace
I will be attending the Hiroshima/Nagasaki Memorial Ceremony on 9th August at 10.40am. This is a memorial ceremony hosted (is hosted the right word?) by the Lord Mayor in Park Square in Leeds, where we will remember those affected by the atomic bombings in Hiroshima and Nagasaki. These memorials are held worldwide on 6th August (when the bomb was dropped on Hiroshima) and 9th August (when the bomb was dropped on Nagasaki). As part of the ceremony, I will be showing people how to fold cranes, which are used worldwide as a symbol of peace, and are linked to Hiroshima and Nagasaki because of the story of Sadako Sasaki. If you'd like any more information, please let me know and I can answer any questions or point you towards the right people.
I will also be folding cranes on 4th August between 12.30pm-1.30pm at the City Museum cafe, then from 5.30pm onwards at Nation of Shopkeepers for those who can't attend the ceremony but would like to mark their remembrance, and to make some cranes in advance for use during the memorial ceremony. Hopefully we'll get a really good turnout and lots of cranes. If you can help, either by coming to the memorial or by popping along to one of the folding sessions (if you can't fold cranes, don't worry, I'll show you), or even just telling other people about it, it would be really appreciated.

I will also be folding cranes on 4th August between 12.30pm-1.30pm at the City Museum cafe, then from 5.30pm onwards at Nation of Shopkeepers for those who can't attend the ceremony but would like to mark their remembrance, and to make some cranes in advance for use during the memorial ceremony. Hopefully we'll get a really good turnout and lots of cranes. If you can help, either by coming to the memorial or by popping along to one of the folding sessions (if you can't fold cranes, don't worry, I'll show you), or even just telling other people about it, it would be really appreciated.

Friday, 14 May 2010
Two hundred!
Last night, I folded my two hundredth (is that even a word?) crane for my project.
This currently puts me at having to fold 7.33 a day to make my target (I'm hoping to have them all done by September, so I have wriggle room and time to wire them all up). However, I'm hoping to get a bit ahead then I'm not obsessively folding all the time like a crazy person. Plus, I'm going to stop folding other stuff, because that's a bit silly really when I've so much to do, even though I really love sonobe units.
It's funny, but when I hit 100, it still felt like there was a really long way to go, but all of a sudden, getting to 200 feels like a real achievement and 800 seems totally doable. Ask me again nearer the time and I'll probably growl at you whilst my hands make foldy gestures because they've taken the paper away from me in case I hurt myself...but for now, it's totally doable.
This currently puts me at having to fold 7.33 a day to make my target (I'm hoping to have them all done by September, so I have wriggle room and time to wire them all up). However, I'm hoping to get a bit ahead then I'm not obsessively folding all the time like a crazy person. Plus, I'm going to stop folding other stuff, because that's a bit silly really when I've so much to do, even though I really love sonobe units.
It's funny, but when I hit 100, it still felt like there was a really long way to go, but all of a sudden, getting to 200 feels like a real achievement and 800 seems totally doable. Ask me again nearer the time and I'll probably growl at you whilst my hands make foldy gestures because they've taken the paper away from me in case I hurt myself...but for now, it's totally doable.
Thursday, 29 April 2010
You might have noticed...
...something rather exciting on my blog. No? You haven't? Then you haven't been paying attention.
Look. (This arrow is supposed to point to the totalizer. Look at the totalizer.)
---------------------------->
Look. (This arrow is supposed to point to the totalizer. Look at the totalizer.)
I have made one hundred cranes. That's right people, 10% of my cranes are now folded, packed into bags and ready to go!
Alright, admittedly as my mum said, 10% of 1000 still means there's a long way to go, but let's not be all "glass half empty" about it. 10% is still a fair percentage.
So yay! One hundred cranes!
Monday, 19 April 2010
It's a giant kick ass crane!
I get emails/tweets from people who spot interesting origami stuff, but nobody mentioned this. I found it by accident when I was doing my usual click-through from links on twitter, which usually throws up interesting blogs or news stories that I'd never normally and it stopped me in my tracks. It was this:

This amazing light up crane was the centrepiece of the Coachella Festival in California. I'd read about the festival (mainly because Matt Smith, the new Doctor in Dr Who was there holding hands with someone, and I'm a geek and read news stories like that), but nowhere had I seen this:

Or anything like this. Ever. It's outstanding. It's made by Crimson Collective, a group of artists from LA, and it's well worth checking out their website for photos of the process of making such a mammoth of a crane. They're also super nice as I emailed them to ask for photos to put on here and they sent a lovely email back with their press pack and an offer to bring the crane over to the UK!
Here are some more fab pics:


It's powered by solar panels, with what looks like a spectrum of different lights. Plus, it's modular, so they can take it down and reuse it (hence being able to bring it over). I wish we had something like this planned for Light Night. Oh, wait, we do! My cranes!

This amazing light up crane was the centrepiece of the Coachella Festival in California. I'd read about the festival (mainly because Matt Smith, the new Doctor in Dr Who was there holding hands with someone, and I'm a geek and read news stories like that), but nowhere had I seen this:

Or anything like this. Ever. It's outstanding. It's made by Crimson Collective, a group of artists from LA, and it's well worth checking out their website for photos of the process of making such a mammoth of a crane. They're also super nice as I emailed them to ask for photos to put on here and they sent a lovely email back with their press pack and an offer to bring the crane over to the UK!
Here are some more fab pics:


It's powered by solar panels, with what looks like a spectrum of different lights. Plus, it's modular, so they can take it down and reuse it (hence being able to bring it over). I wish we had something like this planned for Light Night. Oh, wait, we do! My cranes!
Wednesday, 31 March 2010
Running total
I haven't done much folding yet, as I've been busy with other stuff (did I mention that as well as doing this, I work full time and am also studying for TWO diplomas?)
I have made ten cranes though, which is 1%. it's enough to actually register as a percentage!
A few people have asked about me starting to fold before I've definitely had the go-ahead. I had planned on waiting, but it's a lot of work in addition to everything else I have going on. Not only is there the folding of the cranes, but getting the paper sorted takes ages, plus putting the LEDs in, then connecting the batteries. It will all take time, and I'd rather err on the side of caution.
Plus if I don't get in, I can always have a giveaway of the cranes I've folded so far!
I have made ten cranes though, which is 1%. it's enough to actually register as a percentage!
A few people have asked about me starting to fold before I've definitely had the go-ahead. I had planned on waiting, but it's a lot of work in addition to everything else I have going on. Not only is there the folding of the cranes, but getting the paper sorted takes ages, plus putting the LEDs in, then connecting the batteries. It will all take time, and I'd rather err on the side of caution.
Plus if I don't get in, I can always have a giveaway of the cranes I've folded so far!
Monday, 29 March 2010
Totalizer!
Thank you to Rachel, who gave me the html for a totalizer, which my lovely husband has basically badgered around with it until it was the colour I wanted. Now you can follow my progress as to folding the cranes!
Sunday, 28 March 2010
How to fold an origami crane
If you want to join in with folding 1000 cranes, here's how you do it (apologies for the somewhat blurry photos):

1. starting with a square piece of paper, fold in half diagonally

2. fold in half diagonally again, so it's in quarters

3. lifting the triangular flap you just made, open it out and press it down

4. it should look like this

5. turn over and repeat on the other side

6. fold the edges into the middle. turn over and repeat

7. you should have a kite shape

8. fold the top triangle down along the top of the previous folds (so it makes an inverted triangle)

9. unfold the folds from steps 7 and 8. lift the front flap along the fold from step 8 (it looks like a bird's beak)

10. flatten out. turn over and repeat. (incidentally, this is the bird base)

11. fold the lower outside edges into the middle. turn over and repeat

12. it should look like this

13. turn the right hand flap over as if turning the page of a book (i know that sound rubbish, but it's hard to describe! you should see what i mean)

14. it will look like this

15. fold the bottom point up to meet the top point

16. turn over and repeat steps 13 to 15. it will end up looking like this

17. turn the sides over, again like turning the pages of a book. it will look like this

18. gently pull the inside points out from the centre. you just kind of squash the bottom bits down to keep them in place

19. it will look like this

20. fold the front flaps down - you'll see a natural place to fold them along the middle bit. turn over and repeat

21. take the top of one of the points and gently fold it down. as you fold it down, you'll see a crease in the middle - if you press on that, it will sort of collapse in on itself and create the crane's head

22. it will look like this - you can see how it looks like a crane now!

23. take the wings and gently pull them apart. you'll see a square bit forming in the middle

24. press the square bit down gently and it will pop into place. this is the body of the crane

25. ta da! crane is done!

1. starting with a square piece of paper, fold in half diagonally

2. fold in half diagonally again, so it's in quarters

3. lifting the triangular flap you just made, open it out and press it down

4. it should look like this

5. turn over and repeat on the other side

6. fold the edges into the middle. turn over and repeat

7. you should have a kite shape

8. fold the top triangle down along the top of the previous folds (so it makes an inverted triangle)

9. unfold the folds from steps 7 and 8. lift the front flap along the fold from step 8 (it looks like a bird's beak)

10. flatten out. turn over and repeat. (incidentally, this is the bird base)

11. fold the lower outside edges into the middle. turn over and repeat

12. it should look like this
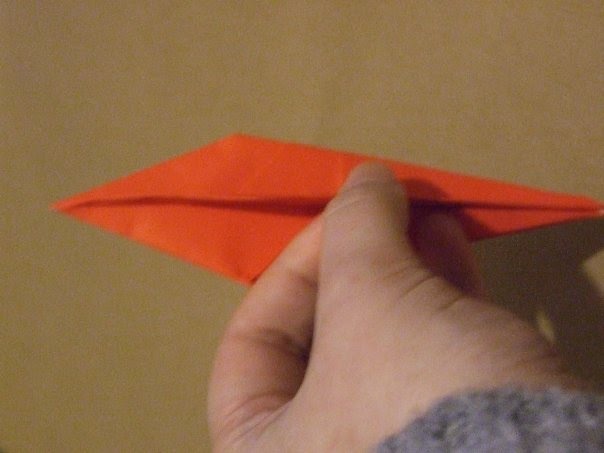
13. turn the right hand flap over as if turning the page of a book (i know that sound rubbish, but it's hard to describe! you should see what i mean)

14. it will look like this

15. fold the bottom point up to meet the top point

16. turn over and repeat steps 13 to 15. it will end up looking like this

17. turn the sides over, again like turning the pages of a book. it will look like this

18. gently pull the inside points out from the centre. you just kind of squash the bottom bits down to keep them in place

19. it will look like this

20. fold the front flaps down - you'll see a natural place to fold them along the middle bit. turn over and repeat

21. take the top of one of the points and gently fold it down. as you fold it down, you'll see a crease in the middle - if you press on that, it will sort of collapse in on itself and create the crane's head

22. it will look like this - you can see how it looks like a crane now!

23. take the wings and gently pull them apart. you'll see a square bit forming in the middle

24. press the square bit down gently and it will pop into place. this is the body of the crane

25. ta da! crane is done!
Saturday, 27 March 2010
It's just a fold to the left...
As it is pretty much a waiting game now until the deadline, it feels a bit odd. the prototype is done, and until I'm making masses of them, I can't foresee the problems that are going to come up. I don't want to buy all the expensive electronic bits until I know I'm definitely going ahead, so I felt at a bit of a loss.
So I did what I always do when I'm at a loose end. I started folding.
I bought a ream of paper, and started making the cranes.
Getting the paper "ready" is a three part process: first I have to fold it to make a square, then cut the excess (which will be what I make the sailboats from), then stick a bit of sellotape into the centre to reinforce where the LED is going to stick through. Only then is the paper ready to fold into the crane. That's the bit that's a pain, rather than the actual origami stuff.
I'm trying to find a sort of totalizer for the blog, so that you can see how I'm getting on, but at the moment, I've folded two cranes. Okay, not so many, but I've made paper for loads more.
I'm also working on making a "how to" post, so if you want to join in, you can learn how to fold your own crane!
So I did what I always do when I'm at a loose end. I started folding.
I bought a ream of paper, and started making the cranes.
Getting the paper "ready" is a three part process: first I have to fold it to make a square, then cut the excess (which will be what I make the sailboats from), then stick a bit of sellotape into the centre to reinforce where the LED is going to stick through. Only then is the paper ready to fold into the crane. That's the bit that's a pain, rather than the actual origami stuff.
I'm trying to find a sort of totalizer for the blog, so that you can see how I'm getting on, but at the moment, I've folded two cranes. Okay, not so many, but I've made paper for loads more.
I'm also working on making a "how to" post, so if you want to join in, you can learn how to fold your own crane!
Tuesday, 9 March 2010
Crane 2.0
Now I had the paper, LED and the (3v) battery, I could make a proper prototype, one that I could test for longevity, for useability...and mainly for problems.
I folded a crane from the printer paper, slid in the LED, and pushed the sticks through the top. This presented the first problem - the top of the crane is the weakest point, and I'm basically pushing holes in it. So I need to work on that.
Then I added the battery to the LED, and wrapped it up in insulation tape. This presented the second problem - the insulation tape is too sticky, and the adhesive was getting between the contact on the LED (the stick! I found out the proper name!) and the battery, which was making the light flicker. Annoying enough for one crane, but can you imagine a whole roomful, all flickering intermittently? So I swapped the insulation tape for sellotape, which worked much better, but was still a little flickery, so that's something else I need to work on.
However, if you ignore these problems, I have my new, all improved, prototype!

Overall though, the idea is pretty sound. It seems feasible and feedback so far has been pretty good. I'd like loads more feedback though, so I'm going to put the idea out there a bit more, and if you want to let people know about the blog, and leave comments, I'd be ever so grateful!
I folded a crane from the printer paper, slid in the LED, and pushed the sticks through the top. This presented the first problem - the top of the crane is the weakest point, and I'm basically pushing holes in it. So I need to work on that.
Then I added the battery to the LED, and wrapped it up in insulation tape. This presented the second problem - the insulation tape is too sticky, and the adhesive was getting between the contact on the LED (the stick! I found out the proper name!) and the battery, which was making the light flicker. Annoying enough for one crane, but can you imagine a whole roomful, all flickering intermittently? So I swapped the insulation tape for sellotape, which worked much better, but was still a little flickery, so that's something else I need to work on.
However, if you ignore these problems, I have my new, all improved, prototype!

Overall though, the idea is pretty sound. It seems feasible and feedback so far has been pretty good. I'd like loads more feedback though, so I'm going to put the idea out there a bit more, and if you want to let people know about the blog, and leave comments, I'd be ever so grateful!
Wednesday, 24 February 2010
You light up my life
So the light up crane was a go-ahead, but I needed better lights now I knew what the cranes would be made of.
I thought that someone had probably already done something similar, though I’d already googled variations on “light up cranes” to make sure I wasn’t copying someone else’s work, so I spent a while googling “make your own fairy lights”, “make your own LED art installation” etc. Turns out, the information superhighway is deficit in light up stuff with clear and easy instructions on how to Do It Yourself.
I googled LEDs, thinking that I was pretty au fait with them already, and it would be a doddle to figure it out, which led me on to realise that despite doing electronics at school, being responsible for the lighting rig at college, and making my own light-up tiara for my wedding, I haven’t the faintest idea how electricity works. Now I’ve spent hours reading up on it, I know less than before.
Since when did I let that stop me?
First task was to find the easiest thing that lights up that I could make. Google yielded an LED throwie. Okay, that looks pretty simple, and I don’t even need the magnet that it’s attached to, so basically I’m looking at taping an LED to a battery, and that’s it. Easy.
Off I went to the local cheap shop to buy:
- one of everything with an LED in it (I wasn’t sure which would be easiest to dismantle)
- a shed load of extra coin batteries (no idea what the difference is in batteries bar size, and don’t really understand the whole voltage thing, but I’m guessing it’s not going to be high enough to cause me any permanent harm) and
- lots and lots of insulation tape. I pretty much live by the “if in doubt, stick tape on it” mantra.
Here’s (part of) my haul:

The LED tealights seemed to be the flimsiest, so I started by trying to take one apart. I actually did this before I even got home, so there’s no pictures, but it was really simple – prise off the bottom and the electric bit falls out, then you can wiggle the LED until the bit soldered to the rest of the mechanism (probably not the right word, but the switch and battery pack and stuff) snaps off. Et voila! You have an empty casing, a load of now useless electric mahgumbo and an LED bulb. They even came with batteries included, so I popped those out to experiment with.
The batteries were teeny-tiny, and there were three of them, which when I finally managed to juggle them into line and put the LED sticks (what do you call the bits that come off the bulb?) onto them made the LED light up! Hurrah, I am a bona fide electronic genius!
Next was to stick a load of tape around this to keep it all together, and then I quickly folded up a crane out of the paper I’d decided to use, and then proceeded to gut it to slide the LED contraption into the middle of it. Finally, I had my very first LED prototype (I decided that the Christmas light one was a test, not a prototype, okay?) of my light up cranes:

The picture isn’t very good, mainly because I’m not a very good photographer. Plus, using a flickering candle LED meant that much like the Christmas light I used when testing out papers, the light was dimmer than I’ll want it for the proper installation, flickery (great for simulating candles, rubbish for cranes) and yellow, whereas I’m planning on using superbright white LEDs. I used the night-vision setting on my camera to show the crane up a bit more:

So, it’s possible. There’s still a million things to sort out, like how do you wire up 1000 LEDs and put them inside the cranes, and string it all up before the LED starts to run out? But, it’s looking properly possible now, and I’m getting rather excited!
I thought that someone had probably already done something similar, though I’d already googled variations on “light up cranes” to make sure I wasn’t copying someone else’s work, so I spent a while googling “make your own fairy lights”, “make your own LED art installation” etc. Turns out, the information superhighway is deficit in light up stuff with clear and easy instructions on how to Do It Yourself.
I googled LEDs, thinking that I was pretty au fait with them already, and it would be a doddle to figure it out, which led me on to realise that despite doing electronics at school, being responsible for the lighting rig at college, and making my own light-up tiara for my wedding, I haven’t the faintest idea how electricity works. Now I’ve spent hours reading up on it, I know less than before.
Since when did I let that stop me?
First task was to find the easiest thing that lights up that I could make. Google yielded an LED throwie. Okay, that looks pretty simple, and I don’t even need the magnet that it’s attached to, so basically I’m looking at taping an LED to a battery, and that’s it. Easy.
Off I went to the local cheap shop to buy:
- one of everything with an LED in it (I wasn’t sure which would be easiest to dismantle)
- a shed load of extra coin batteries (no idea what the difference is in batteries bar size, and don’t really understand the whole voltage thing, but I’m guessing it’s not going to be high enough to cause me any permanent harm) and
- lots and lots of insulation tape. I pretty much live by the “if in doubt, stick tape on it” mantra.
Here’s (part of) my haul:

The LED tealights seemed to be the flimsiest, so I started by trying to take one apart. I actually did this before I even got home, so there’s no pictures, but it was really simple – prise off the bottom and the electric bit falls out, then you can wiggle the LED until the bit soldered to the rest of the mechanism (probably not the right word, but the switch and battery pack and stuff) snaps off. Et voila! You have an empty casing, a load of now useless electric mahgumbo and an LED bulb. They even came with batteries included, so I popped those out to experiment with.
The batteries were teeny-tiny, and there were three of them, which when I finally managed to juggle them into line and put the LED sticks (what do you call the bits that come off the bulb?) onto them made the LED light up! Hurrah, I am a bona fide electronic genius!
Next was to stick a load of tape around this to keep it all together, and then I quickly folded up a crane out of the paper I’d decided to use, and then proceeded to gut it to slide the LED contraption into the middle of it. Finally, I had my very first LED prototype (I decided that the Christmas light one was a test, not a prototype, okay?) of my light up cranes:

The picture isn’t very good, mainly because I’m not a very good photographer. Plus, using a flickering candle LED meant that much like the Christmas light I used when testing out papers, the light was dimmer than I’ll want it for the proper installation, flickery (great for simulating candles, rubbish for cranes) and yellow, whereas I’m planning on using superbright white LEDs. I used the night-vision setting on my camera to show the crane up a bit more:

So, it’s possible. There’s still a million things to sort out, like how do you wire up 1000 LEDs and put them inside the cranes, and string it all up before the LED starts to run out? But, it’s looking properly possible now, and I’m getting rather excited!
Crane vs. Crane
How could I get my cranes to glow? The answer was obvious. Ask John.
John works in my office, and is a PhD in physics-ey stuff. Not particularly in electronics, but he’s a pretty good person to go to if you want to ask about how anything works. Plus, he watches the Discovery Channel a lot, and that’s good enough for me.
We came up with a couple of ideas, which were much better than my rather over-excited “tie them all to fairy lights!” suggestion. Next up were discussions on the actual cranes – we had to know what we’d be lighting before we could decide on how to do it.
Last time I made 1000 cranes I’d used everything from scrapbooking card to takeaway menus. There were even pages from books and stickers in there. This time round, I wanted plain white (the installation is supposed to represent peace and hope, so all pure white reinforced that), and something that was easy to fold (folding card over and over is hard on the hands, and this time, I had a deadline). It also had to be fairly cheap and easy to obtain, and as the cranes would be strung up, weight had to be a factor.
I narrowed it down to two main options for the paper to make the cranes out of:
- Printer paper. The pros of this are that it’s cheap, plentiful, and easy to fold with. Cons are that it doesn’t come in squares, so I’d have to make larger cranes (I’d originally been planning cranes made from 6”x6” paper, which is the standard size of the origami paper I usually use) to square it off easily, or I’d be stuck fiddling with it for a while making sure I was cutting out a perfect square. It’s also fairly thick, so I wasn’t sure if the light would shine through it enough.
- Origami paper. Standard origami paper is pretty easy to come by around here. It’s lightweight, thin (so light shines through easily), and obviously by its very nature easy to fold. It also comes in a standard square, so I could fold straight out of the packet. However, it’s much more expensive than printer paper (around £1 for a 100 sheet pack) and it comes in lots of colours, so even if I fold it “inside out” (so the white on the back of the paper is on the outside, and the colour on the inside) the colour will still glow through if it is lit from inside, and there will be some colours in a pack I can’t use (brown and black, and possibly other darker colours, as they’d swallow up the light inside), which again would make it more expensive.
After lots of test runs of making cranes of different sizes and different colours, and shoving a handy Christmas light into it to assess light distribution, I decided that the printer paper was a better choice all round, as the larger cranes didn’t detract from the effect so I could square it off easily, and I preferred the all-white as it was a clearer connotation (can you have a clear connotation?) of the peace message I was trying to put across. The Christmas light didn’t shine through brilliantly, but it was a small yellow old-style bulb rather than the LEDs we’d been looking at, so I wasn’t too worried about it.
I’d just made my first prototype light-up crane!
John works in my office, and is a PhD in physics-ey stuff. Not particularly in electronics, but he’s a pretty good person to go to if you want to ask about how anything works. Plus, he watches the Discovery Channel a lot, and that’s good enough for me.
We came up with a couple of ideas, which were much better than my rather over-excited “tie them all to fairy lights!” suggestion. Next up were discussions on the actual cranes – we had to know what we’d be lighting before we could decide on how to do it.
Last time I made 1000 cranes I’d used everything from scrapbooking card to takeaway menus. There were even pages from books and stickers in there. This time round, I wanted plain white (the installation is supposed to represent peace and hope, so all pure white reinforced that), and something that was easy to fold (folding card over and over is hard on the hands, and this time, I had a deadline). It also had to be fairly cheap and easy to obtain, and as the cranes would be strung up, weight had to be a factor.
I narrowed it down to two main options for the paper to make the cranes out of:
- Printer paper. The pros of this are that it’s cheap, plentiful, and easy to fold with. Cons are that it doesn’t come in squares, so I’d have to make larger cranes (I’d originally been planning cranes made from 6”x6” paper, which is the standard size of the origami paper I usually use) to square it off easily, or I’d be stuck fiddling with it for a while making sure I was cutting out a perfect square. It’s also fairly thick, so I wasn’t sure if the light would shine through it enough.
- Origami paper. Standard origami paper is pretty easy to come by around here. It’s lightweight, thin (so light shines through easily), and obviously by its very nature easy to fold. It also comes in a standard square, so I could fold straight out of the packet. However, it’s much more expensive than printer paper (around £1 for a 100 sheet pack) and it comes in lots of colours, so even if I fold it “inside out” (so the white on the back of the paper is on the outside, and the colour on the inside) the colour will still glow through if it is lit from inside, and there will be some colours in a pack I can’t use (brown and black, and possibly other darker colours, as they’d swallow up the light inside), which again would make it more expensive.
After lots of test runs of making cranes of different sizes and different colours, and shoving a handy Christmas light into it to assess light distribution, I decided that the printer paper was a better choice all round, as the larger cranes didn’t detract from the effect so I could square it off easily, and I preferred the all-white as it was a clearer connotation (can you have a clear connotation?) of the peace message I was trying to put across. The Christmas light didn’t shine through brilliantly, but it was a small yellow old-style bulb rather than the LEDs we’d been looking at, so I wasn’t too worried about it.
I’d just made my first prototype light-up crane!
Subscribe to:
Posts (Atom)